Simple POS - Point of Sale Made Easy
Simple POS is PHP and jQuery based web application.
Documentation Version 1.2.0
Thank you for purchasing Simple POS - Point of Sale Made Easy
Please read this documentation and if you can't find answer to your question, you can post on item comments page at codecanyon.net Thank you
Installation Instruction
Requirements: Apache 2.2+, Mysql 5.4+, PHP 5.4+
- Copy/Upload the folder and files to your web server using cPanel or FTP
- If you are installing in sub folder, please make sure there is no space in folder names
- Create mysql database, database user and grant all permission to user for this database.
- Open the
http://yourdomain.com/pathtoupload/install/index.php - Step 1: Pre-install system checklist - If there is any issue with checklist, you will need to fix it first to proceed to next step.
- Step2: Provide you Envato Username and Purchase Code to validate the purchase.
- Step 3: Provide the database host, database user, database password and database name to proceed to next step.
Please make sure you don't have $ sign in your password. - Step 4: Site Config: Please Fill in you Simple POS Base URL and select your timezone.
You must check the site url as installer might guess it wrong- Base URL for public_html or www/htdocs folder will be
http://yourdomain.com/orhttp://localhost/ - Base URL for sub-domain will be
http://subdomain.yourdomain.com/ - Base URL for sub-folder will be
http://yourdomain.com/subfolder/orhttp://localhost/subfolder/ - Base URL must not have space and it should end with a trailing slash
- Base URL for public_html or www/htdocs folder will be
- If everything goes smooth, you will be redirect to final page with login details.
- Remove the install folder before start using the Simple POS.
- Login using default username and password. You should can add new admin account before deleting/editing default account.
Request Installation
We will provide the service to install the item for $20 To request the installation, please send $20 to support@tecdiary.com by Paypal or Skrill and email us your license file and hosting control panel details with reference of your payment to support@tecdiary.com
Update Instruction (from 4.x to latest)
Requirements: Apache 2.2+, Mysql 5.4+, PHP 5.4+
- Backup all your files and database. Save/download the backup. (MUST)
- Download
index.php,app/config/config.phpandapp/config/database.php - Delete all files and folders in yourinstallationdirectory/ except
uploads/andfiles/folders to save your uploads - Extract the downloaded file.
- Upload all the files and folders from extracted folder to yourinstallationdirectory/
- Once all the files have been uploaded, please delete SPOS null file from yourinstallationdirectory/
- Upload the index.php, app/config/config.php and app/config/database.php saved in step 2 (replace the latest file with these)
-
Open the
http://yourdomain.com/yourinstallationdirectory/update/index.phpand follow the instructions to update - Once update successfully completed, you can login to your site using your admin credentials.
Updating from V3
We have added the update tool for testing purpose and feedback only. If you are advance user and have good command and experience of backup/restore (files & database) then you can try this update tool.
Please don't try this on your production version. Backup and restore the production version to different location and then try to update that. We are not providing any support for this at least for this version.
Please follow these steps to update from v3.x to beta v4.0
- Backup all your files and database. Save/download the backup. (MUST)
- Save/download database config file (
spos/config/database.php) on your computer - Delete all old files/folders except assets/uploads as your product images and other upload data is in this assets/uploads.
- Upload all the new files/folders (from your downloaded file).
- Move all the contents of assets/uploads/ to newly uploaded uploads/ folder.
- Once all the files are uploaded. We need to update the datase configuratiuon to the newly uploaded database configuration file (
app/config/database.php) form the locally saved copy of database config file in step 2.You need to update the hostname, username, password and database.
LETS ACCESS UPDATE TOOL FROM BROWSER, UPDATE TOOL WON'T ASK FOR DATABASE CONFIG AS WE HAVE ALREADY UPDATED THE DATABASE SETTINGS. - Open the browser and type
http://yourdomain.com/pathtoupload/update/index.php - Step 1: Pre-install system checklist - If there is any issue with checklist, you will need to fix it first to proceed to next step.
- Step 2: Provide your Envato Username and Purchase Code to validate and update your license.
- Step 3: Site Config: Please fill in you Base URL and select your timezone.
You must check the base url as update tool can guess it wrong.This is the same base_url that you have in your old spos/config/config.php file- Base URL for public_html or www/htdocs folder will be
http://yourdomain.com/orhttp://localhost/ - Base URL for sub-domain will be
http://subdomain.yourdomain.com/ - Base URL for sub-folder will be
http://yourdomain.com/subfolder/orhttp://localhost/subfolder/ - Base URL must not have space and it should end with a trailing slash
- Base URL for public_html or www/htdocs folder will be
- If everything goes smooth, you will be redirect to final page with update complete message.
- Remove the install and update folder before start using the Simple POS. If you find any issue with update, please email to support@tecdiary.com
Hardware
1. Receipt Printers:
We have tested the update V4 with Bixolon SRP-350II (USB) and Xprinter XP-Q200II (LAN Interface).
Compatibility
Interfaces and operating systemsThe package used is known to work with the following OS/interface combinations:
List of Printers
Many thermal receipt printers support ESC/POS to some degree. This driver has been known to work with:
- AURES ODP-333
- AURES ODP-500
- Bixolon SRP-350III
- Citizen CBM1000-II
- Daruma DR800
- EPOS TEP 220M
- Epson TM-T88III
- Epson TM-T88IV
- Epson TM-T88V
- Epson TM-T70
- Epson TM-T82II
- Epson TM-T20
- Epson TM-T70II
- Epson TM-U220
- Epson FX-890 (requires
feedForm()to release paper). - Excelvan HOP-E58
- Excelvan HOP-E200
- Excelvan HOP-E801
- Excelvan ZJ-8220
- Gainscha GP-5890x (Also marketed as EC Line 5890x)
- Gainscha GP-U80300I (Also marketed as gprinter GP-U80300I)
- gprinter GP-U80160I
- Hasar HTP 250
- Metapace T-1
- Okipos 80 Plus III
- P-822D
- P85A-401 (make unknown)
- Rongta RP326US
- Rongta RP58-U
- SEYPOS PRP-300 (Also marketed as TYSSO PRP-300)
- Silicon SP-201 / RP80USE
- Star TSP100 ECO
- Star TSP-650
- Star TUP-592
- SPRT SP-POS88V
- Xprinter F-900
- Xprinter XP-Q800
- Venus V248T
- Zjiang NT-58H
- Zjiang ZJ-5870
- Zjiang ZJ-5890T (Marketed as POS 5890T)
- Zjiang ZJ-5890K
2. Barcode Scanners/Readers:
Any of the barcode scanners/readers will work fine with v4 as long as it can read accurately.
3. Magnetic Card Readers:
Most of the Magnetic Card Readers will work fine. We have tested this with Uniform MSR213 Magnetic Stripe Card Reader (USB - 3 Track Reader).
For tablet/mobile card readers: No such feature and recommendation yet.
4. Cash Drawers:
You should buy the cash drawers that can be connected to pos printer. To use cash drawers, you printer should have the port to connect cash drawer as Bixolon SRP350II and Xprinter XP-Q200II.
For Browser Print, you might need to set your printer to open cash drawer before printing.
For Localhost/PHP POS Print Server, It will be fine as cash drawer will be opened with printing and can be opened without printing.
5. Customer Display:
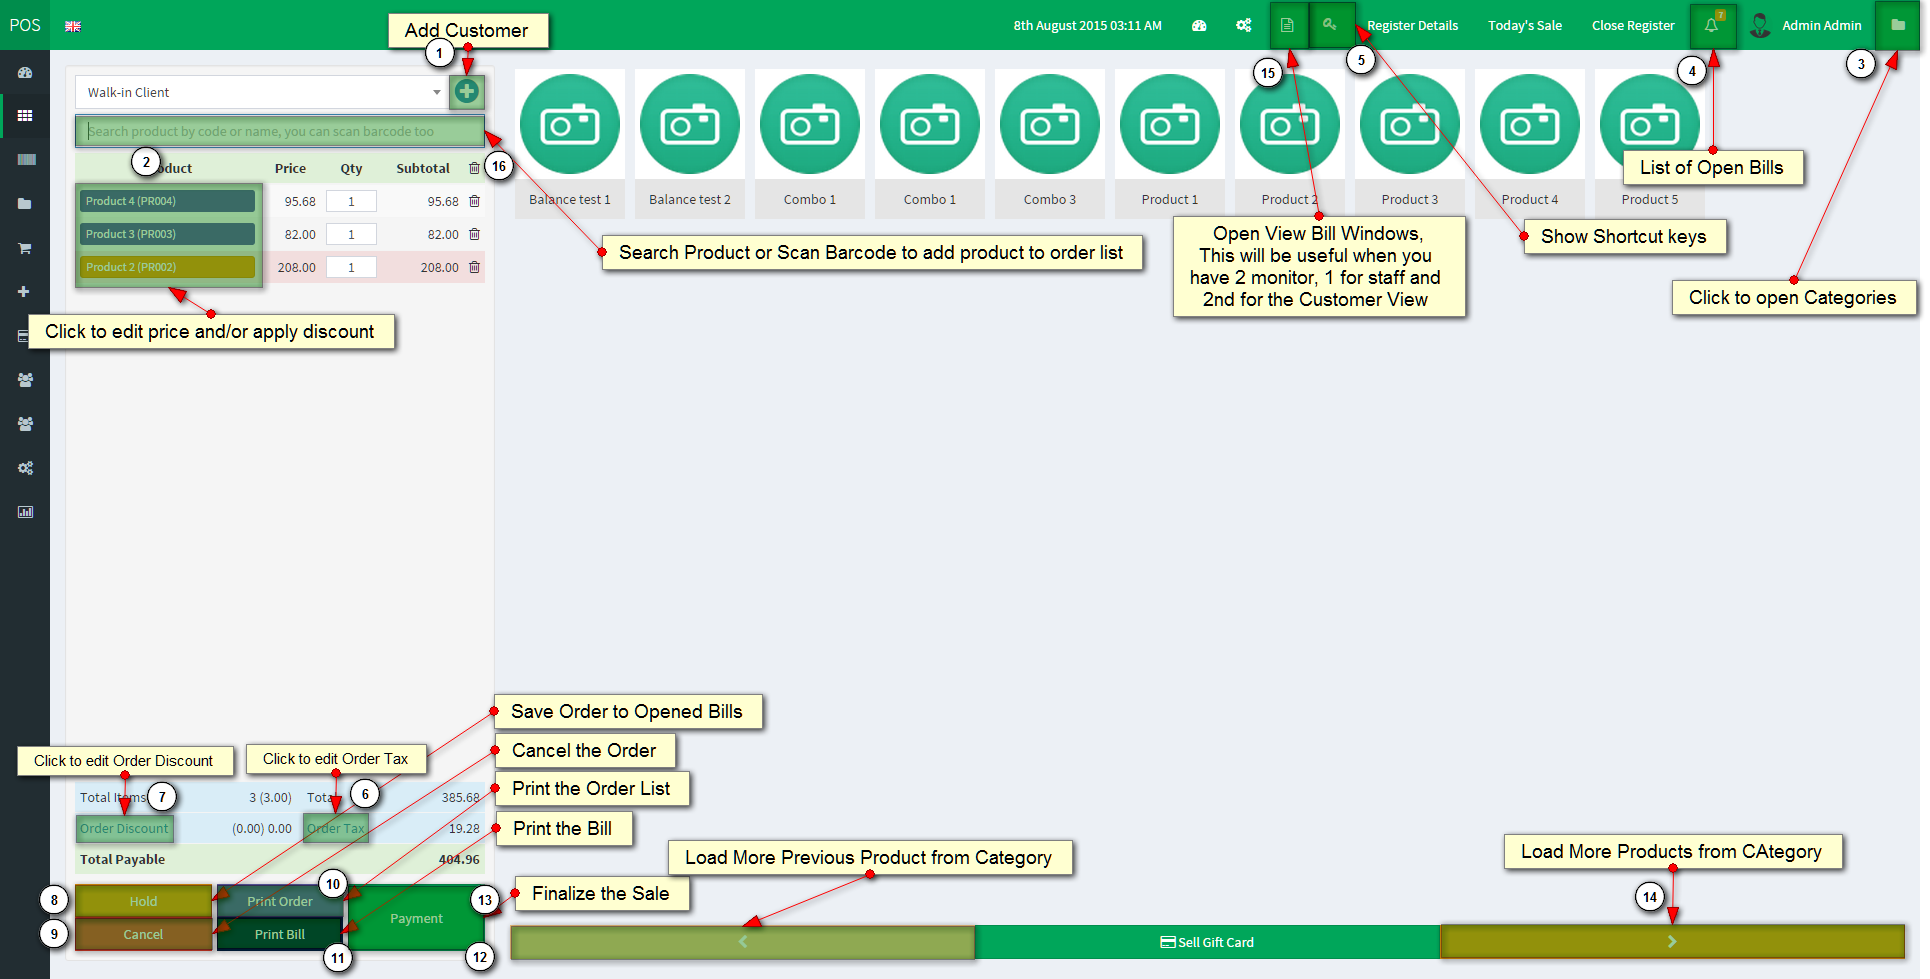
In the top bar there is monitor icon (Customer Display) to open customer display window. You need to have dual display setup to show the window to customer. To setup the dual display, please check the FAQ "How can I setup customer display in POS?".
Only Dual Display, No Digital Customer Display is Supported.
6. For barcode and label printing:
Any desktop laser print will work fine for barcode printing. The label print should work with label printer but the design is very simple and we will not offer any support to customize this. You can customize as you like or hire developer.
Live Demo For Simple POS - Point of Sale Made Easy.
Demo Link: https://spos.tecdiary.my/
Login Details:
Role:               Username                 Password
Admin:              admin@tecdiary.com       12345678
Sales staff:        salesman@tecdiary.com    12345678
Credits
Thanks to all great people who are developing open source software.
- CodeIgniter - PHP-Framework under MIT License
- Ion_auth - A simple, lightweight authentication library by Ben Edmunds under the Apache License v2
- Bootstrap - Most popular HTML, CSS, and JS framework under MIT License
- jQuery - A fast, small, and feature-rich JavaScript library under MIT License
- Font Awesome - The iconic font and CSS toolkit under GPL License.
- DataTables - A plug-in for the jQuery under two licenses: GPL v2 license or a BSD (3-point) License
- Zend Framework 1 (barcode library) - under New BSD License
- Moment.js - Moment.js is freely distributable under the terms of the MIT license.
- Bootstrap-datetimepicker - Date and Time picker widget based on bootstrap under Apache License V2
- iCheck - Highly customizable check boxes and radio buttons under MIT License
- Accounting.js - A tiny JavaScript library for number, money and currency formatting under MIT License
- jQuery Cookie - A simple, lightweight jQuery plugin to manage cookies under MIT License
- Commercial Licenses
- Highcharts
- FormValidator
- Redactor Text Editor
Thanks to all the friends for their suggestions, feedback and help.
Frequently Asked Questions
General
-
How to enable HTTPS support?
You can easily enable https by editing the 2 lines in config file (
app/config/config.php) as following:- Update base url from
http://yoursite.comtohttps://yoursite.com - Set
$config['cookie_secure']to TRUE
- Update base url from
-
Can I modify the item?
Yes, you can modify the script as per your needs and license.
We offer Regular License only that allows you to use the Item to create one single End Product for yourself or for one client (a “single application”). If you have more then once clients, you will need to purchase separate license for each client.
You can visit this link to licensing faqs page of Evnato marketplace.
-
Can I manage multiple stores?
No, you can only manage 1 store with single installation. If you have more that 1 stores and want to use for all, you will need to purchase separate license for each store.
-
Can I white label it to have my company name and logo?
Yes, you can. Please update the settings with site name and logo.
-
How can I change the receipt layout?
Yes, Please modify the themes/default/views/pos/view.php as you need.
-
How can I translate into other language?
You can easily add new languages to Simple POS. Please click here to jump to guide.
-
Can I install this item on localhost with wamp/xampp/easyphp?
You can install this item on localhost with any web platform xampp, mamp, lamp, wamp or easyphp. Internet connectivity is required for installation to verify the purchase. Once installed, you can use it without Internet.
-
Does it supports my barcode scanner/receipt printer/magnetic card reader?
Please click here to jump to hardware section.
-
Will I get the full source code?
Yes, you will get 100% source code including php, js, html and css.
-
Are you using a PHP Framework for this item?
Yes, CodeIgniter – PHP Framework created by EllisLab and is now a project of the British Columbia Institute of Technology.
-
How do Simple POS track inventory?
Products quantity will automatically decreased upon sale and increased on adding purchase. You even can edit the product to change the quantity.
-
Why I can sell the products even if I don't have quantity?
Once you add the product to order list, the item color will be red if you don't have quantity for the product. But Simple POS allows you sale items even if you don't have quantity and will set the quantity to negative.
-
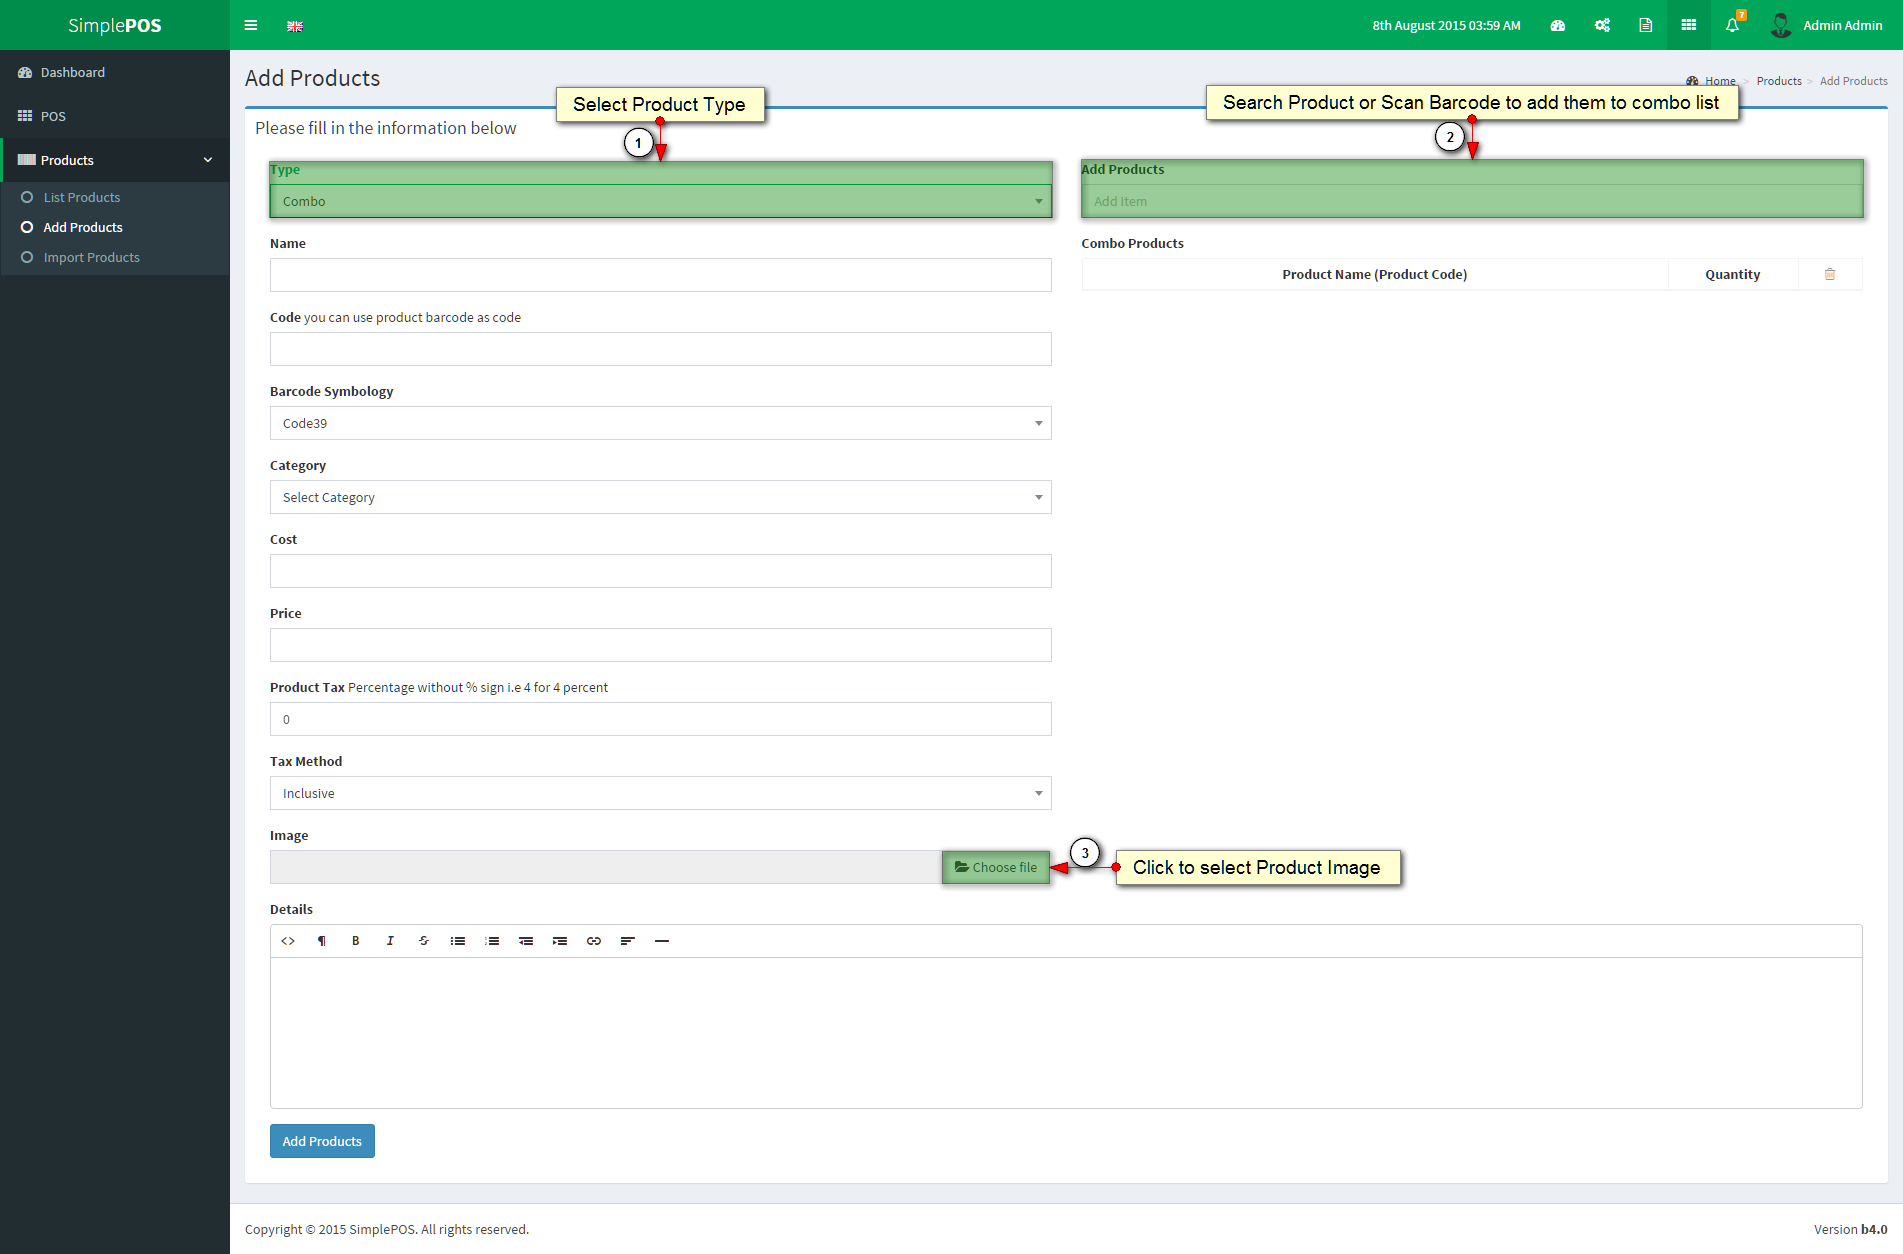
What is the difference between inclusive and exclusive tax on add product page?
Inclusive tax method means that tax is already included in the price. Exclusive tax method means that tax is not included in the price and should be calculated/added separately.
For example:
Product Price 100 and Tax 10%

                                                        Inclusive tax method: Price 90.91 and Tax amount: 9.09 = 100 (total price with tax)

Exclusive tax method: Price 100 and Tax amount: 10 = 110 (total price with tax) -
Where are the header and footer view files?
The header and footer files are in
themes/default/views/ -
How can I change Quick Cash buttons?
Please modify the app_lang.php in app/language/english/. If you are not using English then see the file in app/language/yourLanguageFolder/
-
Why barcode images are not showing on print barcode and label page?
Please check that ini_set function is not disabled. The ini_set function should be enabled to use barcode feature.
-
How does discount applied to the products and order?
Product level discount will be applied on the product price before any tax calculation.
i.e, Product Price - Product Discount + Product Tax (product tax calculated on Product Price - Product Discount)Order level discount will be applied on the order total (total + product price) before any order tax calculation.
i.e, Order Total - Order Discount + Order Tax (order tax calculated on Order Total - Order Discount) -
Can I disable print dialog after submitting the sale on POS?
Yes, by modifying a line of code, please open themes/default/views/pos/view.php and search for
window.print();remove/comment it to disable print dialog. -
Can I auto redirect back to POS after submitting the sale on POS?
Yes, by modifying a line of code, please open app/controllers/pos.php and search for
redirect("pos/view/" . $sale['sale_id']);replace it withredirect("pos");Now after sale, system will redirect you back to POS instead of view receipt page. -
How can I setup customer display in POS?
You can click the monitor icon (Customer Display) in topbar at pos screen and then display it to your 2nd monitor. Here is the guide to setup dual display.
-
What are the printing options?
There are 3 options for printing
- PHP Server (only for LAN/localhost/Desktop)
If you have install the Simple POS locally, you can choose this option on the installed machine. - Web Browser
To use the web browser's default printing. - PHP POS Print Server
If you have installed the Simple POS on live/local server and want to access it from different machines, you will need to install PHP POS Print Server (ppp: https://github.com/Tecdiary/ppp). We recommend you to install it. Please set the local printers to yes to use the local ppp printers so that each machine could have separate printers. Then you will need to open ppp app to add local printers and set defaults.
For those who can't manage to install (ppp), they can purchase PHP POS Print Server (Windows Installer).
- PHP Server (only for LAN/localhost/Desktop)
Account and Users
-
What type of account are available?
These are the account type
- Admin
- Sales Staff
-
I am Admin and how do I reset the password for sales staff user?
Please visit list user and edit the user to reset the password.
-
How do I delete account?
If you want to delete account for staff member, please visit list users sub menu under people main menu. All the account are listed on this page and you can delete any of them.
Payments
-
What payment gateways are available in Simple POS?
Only Stripe payment gateway is available for processing credit cards in their supported countries. You can check https://stripe.com
-
Why Stripe payment take long time?
API calls to server could take few seconds as the payment is processed after submit.
-
Will you be adding more payment gateways?
Yes, we will be exploring the new gateways.
Error
-
Why am I getting CloudFlare Security or Blank error on verification while installing the item?
If you are not getting any error but blank red alert or CloudFlare Security error mean your request is no reaching to verification server. Please check that you server is not blocking the curl request and secondly there are chances that CloudFlare might be challenging your request due to various reasons. Please check with your host and request them to white list CloudFlare ips https://www.cloudflare.com/ips
Updating your Anti-Virus and Browser might help. You can check with your host too.
You can try different host and/or install it locally with any web platform easyphp/lamp/mamp/wamp/xampp.
-
Why I am getting "no input specified" error after install/update?
Please add the ? 'question sign' after index.php in the .htaccess file, you line will be look as
RewriteRule ^(.*)$ /index.php?$1 [L]code.For more information, please visit this guide page.
-
Why the installer/update tool is locked?
After successfully installation/update, the installer/update tool will be automatically locked.
If you having any issue after installation or like to perform the installation again, please upload the files again.
-
Why am I getting 404 Not Found error page after installation?
Please
- make sure that your apache mod_rewite is enabled and configured to use .htaccess from site directory
- check that .htaccess file is successfully uploaded and exists in the main directory of installation
- base_url in app/config/config.php
If you are using godaddy, please visit the codeigniter official guide here. You might need to check and modify you .htaccess files too.
-
Why am I getting 500 Internal Server Error page after installation?
Please
- check your database settings in app/config/database.php
- check your folders/files permissions (folders should have 755 and files should have 644 permissions).
- check your server error log for more info or request your host to provide error log before posting comment as you should post with error details.
-
Why sale time is different from my computer time?
The time with Javascript and PHP could be different as javascript use your computer time but php will use your server time.
Please check your timezone in index.php and make sure that you have set the correct time zone. You can find your timezone at http://php.net/manual/en/timezones.php
-
Why I can't send emails?
We have tested the email function on different hosting servers. Please check with your host about this and if you need to check the code that will be in app/libraries/tec.php and look for
send_email() -
Why I can't login and getting time out error?
Timeout feature has been enabled. The user will be timed out after 3 unsuccessful login attempts for 10 minutes. You can disabled this in app/config/ion_auth.php by changing the
$config['track_login_attempts'] = TRUE;to$config['track_login_attempts'] = FALSE;or you can increase the attempts from 3 to any number you like. -
Why I can't upload any file?
This could be due to permission on the /uploads. Please set 777 permission to /uploads and all other folder in the /uploads/
-
Why I getting db error and can't login?
Please check your db configuration in app/config/database.php
-
Can I use this on Windows server with IIS?
Yes but we haven't tested this and don't provide any support for setup.
If URL Rewrite module is not installed, please install it from here http://www.iis.net/downloads/microsoft/url-rewrite. Please check the complete web.config file. Place this in the main installation folder where the index.php is placed.
<?xml version="1.0" encoding="UTF-8"?> <configuration> <system.webServer> <rewrite> <rules> <rule name="Imported Rule 1" stopProcessing="true"> <match url="^(.*)$" ignoreCase="false" /> <conditions logicalGrouping="MatchAll"> <add input="{REQUEST_FILENAME}" matchType="IsDirectory" negate="true" /> <add input="{REQUEST_FILENAME}" matchType="IsFile" negate="true" /> </conditions> <action type="Rewrite" url="index.php?url={R:1}" appendQueryString="true" /> </rule> </rules> </rewrite> </system.webServer> </configuration> -
Can I use this with NGINX?
Yes but we haven't tested this and don't provide any support for setup.
You can follow the guide http://wiki.nginx.org/Codeigniter. Your nginx.conf file will look like this.
server { server_name domain.tld; root /var/www/codeignitor; index index.html index.php; # set expiration of assets to MAX for caching location ~* \.(ico|css|js|gif|jpe?g|png)(\?[0-9]+)?$ { expires max; log_not_found off; } location / { # Check if a file or directory index file exists, else route it to index.php. try_files $uri $uri/ /index.php; } location ~* \.php$ { fastcgi_pass 127.0.0.1:9000; include fastcgi.conf; } location ~ /files { deny all; return 404; } } -
Why some products are missing from order when I add 100+ products?
There is no restriction in Simple POS on the number of order items. If you are having such issue, please check your php configuration file (php.ini) for
max_input_varsand set it to higher number i.e, 10000. -
Why Wordpress showing 404 page when I access the Simple POS?
You can exclude sub-directory from RewriteRule of wordpress by adding the line below to your .htaccess file in main directory of wordpress.
RewriteCond %{REQUEST_URI} !^/(mydir|mydir/.*)$
User Guide
Adding Language
Guide to add new language.
- Please create new folder in app/language/ and name it
yourlanguagename - Folder name should be without space and all lower letters.
- Copy all the files from app/language/english/ and paste then to app/language/
yourlanguagename/ - Now you can translate these all file to your language
- Download flag image (format: png, width: 16px, height: 11px) and paste it in themes/default/assets/images/
- You can add new key to language array. (See Code Section)
Please replace the yourlanguagename with your language For example, spanish, french, chinese etc
To add select option in setting's language
Please open themes/default/views/settings/index.php and search for ( $available_lang = ) You can replace the default with your theme if you are using different theme. You can add new array key for your language as following:
$available_lang = array(
       'english' => 'English',
        'yourlanguagename' => 'Your Language Name',
        );
yourlanguagename must be same folder name that you created in app/language/
If you are getting the error "Unable to load the requested language file: language/yourlanguagename/form_validation_lang.php or calendar_lang.php" Then you will need to add your language in lib/language/ as you did above for app/language/ and translate the system language files to your language.
Add/Remove column to table
Here are the steps to follow
To add a column you will need to
- Modify the select statement and select the desired column, in the controller.
- Add new element to datatables columns (should be in sequence) in the relative view file.
- Lastly add the th tag with column heading to table head (should be in sequence).
To remove a column you will need to
- Modify the select statement and remove the desired column, in the controller.
- Remove the element form columns of datatables in the relative view file.
- Lastly Remove the th tag with column heading to table head.
Sorting Tables
We have used datatables library for all listing tables. If you need to change any table sorting column, you will need to modify the view file.
The first column of the table will start from index 0 and then increase 1 with each columns. Let say you want to sort the table with 4th column then you will need to use index 3 as "aaSorting": [[3, "asc"]],
You can change the sorting for any table by modifying the files as described here.
For example, if you need to change the sorting for customers, you will need to edit the /theme/default/customers/index.php and search
"aaSorting": [[0, "asc"]],This is being sorted for first table column, If you want to sort it by id (2nd table column) then you will need to change as
"aaSorting": [[1, "asc"]],You even can sort the table with multiple columns as
"aaSorting": [[0, "asc"], [1, "asc"]],Barcodes and Labels
Barcode page is designed to be printed with desktop laser printers. Barcode sheet or barcode pages have 2 columns' table (2 product per row and medium barcode image with 60px height). For labels, each label will be printed on different page as most of you will print label with label printers. We don't provide any support for modify the design.
If you need to modify any of the barcode/label page to show/remove any information, you can do so by modify the products controller. The functions are mentioned that handle the pages.
Functions/Methods handling the barcodes and labels pages are
single_barcode()- Handles barcode printing for single productssingle_label()- Handles label printing for single productsprint_barcodes()- Handles barcode printing for multiple products based on categoryprint_lables()- Handles label printing for multiple products based on category
File: app/controllers/products.php
Request Installation
We will provide the service to install the item for $20 To request the installation, please send $20 to support@tecdiary.com by Paypal or Skrill and email us your license file and hosting control panel details with reference of your payment to support@tecdiary.com
Request Update
We will provide the service to update the item from v3 for $20 To request the update, please send $20 to support@tecdiary.com by Paypal or Skrill and email us your license file, v3 installation path/link with login details and hosting control panel details with reference of your payment to support@tecdiary.com
Custom Modifications
Yes, we do provide customization services to modify/enhance the item functionality to suit your needs. We charge $50 per hour. Please email to saleem@tecdiary.com to check availability, estimated cost and time.
Feature Request
Yes, we would love to listen your requests/feedback. Please prepare the details with examples before emailing to saleem@tecdiary.com